The Pager  option works with our Design Your Own and/or pre-designed templates to give you the control tools you need to modify composite images, build creative image designs, or alter the image characteristics of your pictures. Pager will also let you add type. option works with our Design Your Own and/or pre-designed templates to give you the control tools you need to modify composite images, build creative image designs, or alter the image characteristics of your pictures. Pager will also let you add type.
Montage and collage enlargements, where you include a grouping of different photographs on the same print, are easy to create.
You should be able use our Design Your Own option (with Pager) to create your first design in under an hour. You’ll pick up speed with subsequent designs.
A good way to save designing time is by using one of our pre-designed album pages as a starting point. Just click on an album catalog and choose any of the hundreds of templates we’ve designed for you. Then, click on the Pager button and modify our basic design to your taste. (For example, you can add drop shadows, strokes or include type.)
You can save every design you create (under My Templates) so that you can recall any template for a future job. Once recalled you can just drag and drop new images into the template in seconds, creating beautiful montages that will impress your clients and generate nice profits.
This is a quick start guide to show you the tools you’ll be using.
For a more detailed explanation of how to use Pager for your design projects please click on the two topics below:
How To Create A Collage Enlargement
How To Create A Montage Enlargement
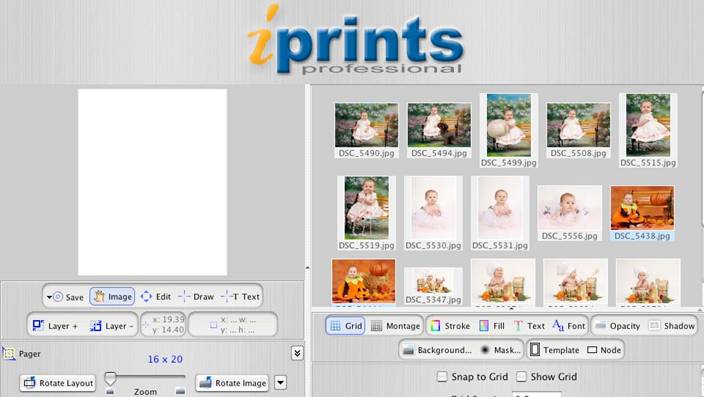
Opening the Pager Design Window
Start by clicking on the Pager  icon to open up the Pager tools that you will use. icon to open up the Pager tools that you will use.
Note: The thumbnail images are brought into the right side of the window by clicking on Folder…  icon and selecting the file containing the photographs from your hard drive.) icon and selecting the file containing the photographs from your hard drive.)
Here are the Pager tools you’ll be working with. (Important: If you click on  and the tools are grayed out you are still in the standard print or enlarging sizes; not the Design Your Own sizes where you need to be. So, click on the Design Your Own tab at the top of the Catalog window.) and the tools are grayed out you are still in the standard print or enlarging sizes; not the Design Your Own sizes where you need to be. So, click on the Design Your Own tab at the top of the Catalog window.)
These tools are under the layout window pictures on the left of your screen:
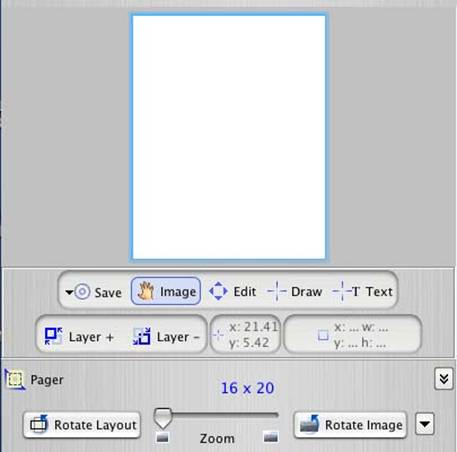
The Zoom slider will allow you to enlarge you image within the layout window.
The Image tool lets you move an image around within a picture node for placement. Usage is the same as in a standard layout. Just click and hold the mouse button to drag your image to the desired position within the node. You’ll use the Zoom and Image tools in conjunction, switching back and forth from one to the other, to precisely size and place your images. tool lets you move an image around within a picture node for placement. Usage is the same as in a standard layout. Just click and hold the mouse button to drag your image to the desired position within the node. You’ll use the Zoom and Image tools in conjunction, switching back and forth from one to the other, to precisely size and place your images.
You’ll use the Draw  tool when you want to add new picture nodes and the Text tool when you want to add new picture nodes and the Text  drawing too lto add new nodes that will contain type. drawing too lto add new nodes that will contain type.
Select the Save  button after completing your node additions and modifications to retain the new template for future use. A dialog box below will open asking your to “Enter a template name.” Simply type a new name for the item and press the Return key to save it. You will see the new template appear in the My Templates window. button after completing your node additions and modifications to retain the new template for future use. A dialog box below will open asking your to “Enter a template name.” Simply type a new name for the item and press the Return key to save it. You will see the new template appear in the My Templates window.
You will use the Layer + and Layer – tools  to place your nodes in layers above or behind each other. These tools let you create overlapping pictures, with some pictures appearing to be on top of others. to place your nodes in layers above or behind each other. These tools let you create overlapping pictures, with some pictures appearing to be on top of others.
Node Creation/Modification/Deletion
To Create a Node:
1) Click on the Draw button to start an image node, or Text Draw to start a text node.
2) Move your cursor into the template’s layout on the location the node should begin.
3) Click and drag the cursor towards the point you would like the node to end and you will see the node begin to draw. You can hold the mouse button down and adjust as long as needed to create the desired size. Simply release the mouse button when you are done to see the created node.
To Modify a Node:
To alter a node, click the Edit  button and move your mouse over the nodes in the layout. Once inside or on a node, you will see the mouse cursor change to one of the following shapes, depending upon the cursor’s location: button and move your mouse over the nodes in the layout. Once inside or on a node, you will see the mouse cursor change to one of the following shapes, depending upon the cursor’s location:
Editing a node without changing its size: This can be done by either moving the node completely or by rotating it.
1) Moving a Node - If you hold your mouse in the center of a node, this cursor  will appear to allow you to move the node. Click and drag the node to a new desired location within the layout.
2) Rotate a Node - If you hold your mouse just inside a node’s corner this cursor  will appear to allow you to rotate it. You then have the option of clicking and dragging the node to a new desired location on the layout.
Editing a node’s size: Resizing a node can be done from either the sides or the corners.
1) From the sides - If you hold your mouse over one of the node’s bounds lines (except a corner) this cursor  will appear to allow you to alter the node’s height or width. Click and drag the line in towards the center of the node to reduce the size or away from the center to increase it.
2) From the corners - If you hold your mouse over one of the node’s corners, this cursor  will appear to allow you to alter the node’s height and width, retaining the node’s proportions. Click and drag the corner in towards the center of the node to reduce the size or away from the center to increase it.
To remove a node: Right-click (with a PC) or Option click on it (Mac) and select Remove from the drop-down menu.
Additional Design Capabilities:
These tools are under the thumbnail pictures on the right of your screen:

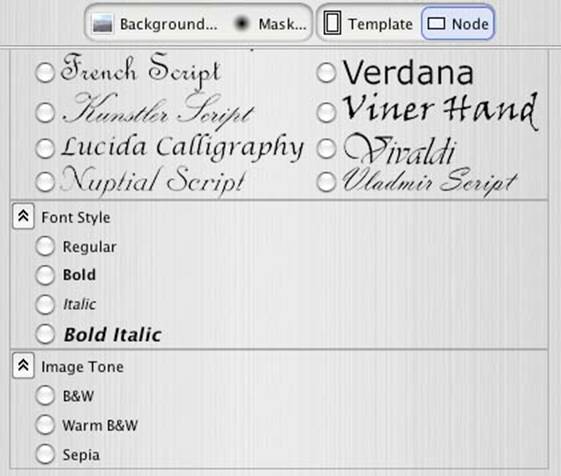
Pager offers the ability to add various design elements to the layouts and nodes you create. There are built in options for adding color options, shading and shadowing, and studio-supplied backgrounds and masks. We offer 14 different fonts and B&W image tone selections and you have the option of adding fonts from your own computer system (as images).
The Grid  button allows you to view and set spacing on a visible grid that can be used to arrange nodes against. button allows you to view and set spacing on a visible grid that can be used to arrange nodes against.
Designer’s Tip: Clicking on the Grid button gives you three important tools. First, you can set and/or change the grid spacing. Second, you can turn the grid on and off with a check box. Third, you can check “Snap to Grid.” This can be very handy in aligning nodes. Be sure to turn off the Snap when you don’t need it, though.
The Montage  button gives you a quick and easy method of creating Montage Enlargements. Montages have ordered groupings of individual photographs on a single enlargement. To see our complete, illustrated tutorial on how you can create a Montage Enlargement, please click here. button gives you a quick and easy method of creating Montage Enlargements. Montages have ordered groupings of individual photographs on a single enlargement. To see our complete, illustrated tutorial on how you can create a Montage Enlargement, please click here.
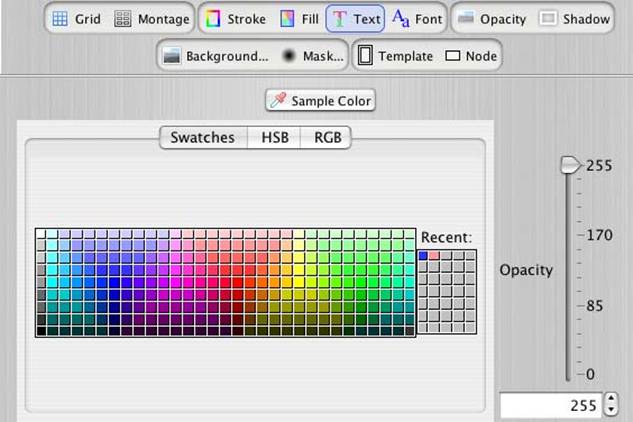
The Stroke  button allows you to add color strokes (borders) to selected nodes. The screen below will allow you to set the width, colors, and opacity settings. button allows you to add color strokes (borders) to selected nodes. The screen below will allow you to set the width, colors, and opacity settings.
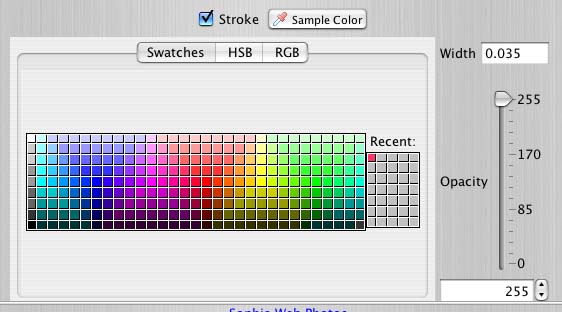
TIP:Try to select fairly standard, non-extreme colors because some color ranges may not transfer well through photographic printing, rendering the printed result slightly different from what was submitted.
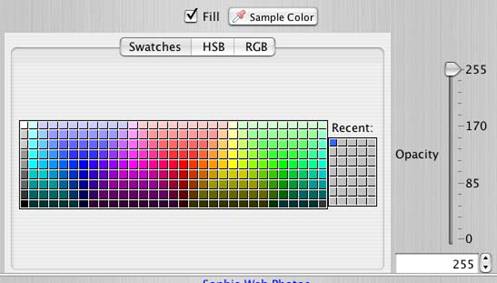
The Fill  button allows you to add colored backgrounds to your layouts. The screen below will appear, allowing you to set the color and opacity settings. button allows you to add colored backgrounds to your layouts. The screen below will appear, allowing you to set the color and opacity settings.
TIP:Try to select non-extreme, standard colors because some color ranges may not transfer exactly as seen on your monitor through photographic printing, rendering the printed result slightly different from what was submitted.
The Text  button allows you to add specified color to text. The screen below will appear, allowing you to set the color and opacity settings on your type. button allows you to add specified color to text. The screen below will appear, allowing you to set the color and opacity settings on your type.
TIP:Try to select non-extreme, standard colors because some color ranges may not transfer exactly as seen on your monitor through photographic printing, rendering the printed result slightly different from what was submitted.
The Sample Color 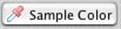 button appears on the Stroke, Fill and Text windows. This is an excellent design tool. It lets you sample a color from your photographic subject matter and transfer that color to a stroke, a fill or the text, visually tying your design elements together and giving your layout a great professional look. button appears on the Stroke, Fill and Text windows. This is an excellent design tool. It lets you sample a color from your photographic subject matter and transfer that color to a stroke, a fill or the text, visually tying your design elements together and giving your layout a great professional look.
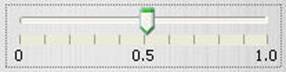
The Opacity  button allows you to add an opaque mask to a node. The opacity slider allows you to adjust the opacity to soften and lighten the image within a node. button allows you to add an opaque mask to a node. The opacity slider allows you to adjust the opacity to soften and lighten the image within a node.
The Shadow  button gives you a quick and easy way to add a drop shadow to a currently selected node. The screen below will allow you to set the X location (left and right), the Y location (above or below), the shadow’s opacity and the degree of blur. We suggest setting your X and Y first. Then, lighten the drop shadow with the opacity setting. Finally, add adjust the blur slider to achieve your preferred drop shadow. button gives you a quick and easy way to add a drop shadow to a currently selected node. The screen below will allow you to set the X location (left and right), the Y location (above or below), the shadow’s opacity and the degree of blur. We suggest setting your X and Y first. Then, lighten the drop shadow with the opacity setting. Finally, add adjust the blur slider to achieve your preferred drop shadow.
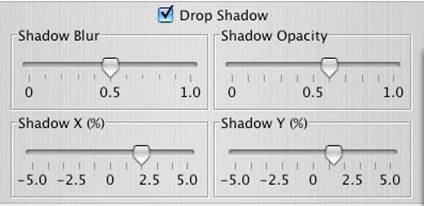
TIP:You can easily standardize your drop shadows (as well as strokes combined with drop shadows) on a composition by designing one original node and then duplicating it to create another node. Right-click and select Duplicate from the drop-down menu on a PC. On a Mac you’ll need to Control-click and then select Duplicate from the menu. The drop-shadows and/or strokes will be duplicated. Then, you can resize the nodes, keeping both the drop-shadows and the strokes.
The Background and Mask  buttons allow you to add in your own image as a background for the layout or as a mask on a node. Selecting either button will bring up a browse window of your computer’s hard drive to allow you to locate the desired image. buttons allow you to add in your own image as a background for the layout or as a mask on a node. Selecting either button will bring up a browse window of your computer’s hard drive to allow you to locate the desired image.
The Template  button allows you to select from certain lab supplied options that may be applied to your layout. button allows you to select from certain lab supplied options that may be applied to your layout.
The Node  button allows you to select from our various lab-supplied options, which may be applied to individual nodes in your layout. These include your choice of any of our 14 fonts and the ability to convert your color pictures to any of three black and white tones. button allows you to select from our various lab-supplied options, which may be applied to individual nodes in your layout. These include your choice of any of our 14 fonts and the ability to convert your color pictures to any of three black and white tones.
|